Finding a comment system for static blogs has always been difficult. Third-party services like Disqus can raise privacy concerns, while self-hosted solutions can be difficult to maintain. Fortunately, the Fediverse, and especially Mastodon, offers a great comment system that we can integrate into our blogs.
In this article, I will explain step-by-step how to add Mastodon comments to your Pelican-based static blog site.
What are Mastodon Comments?#
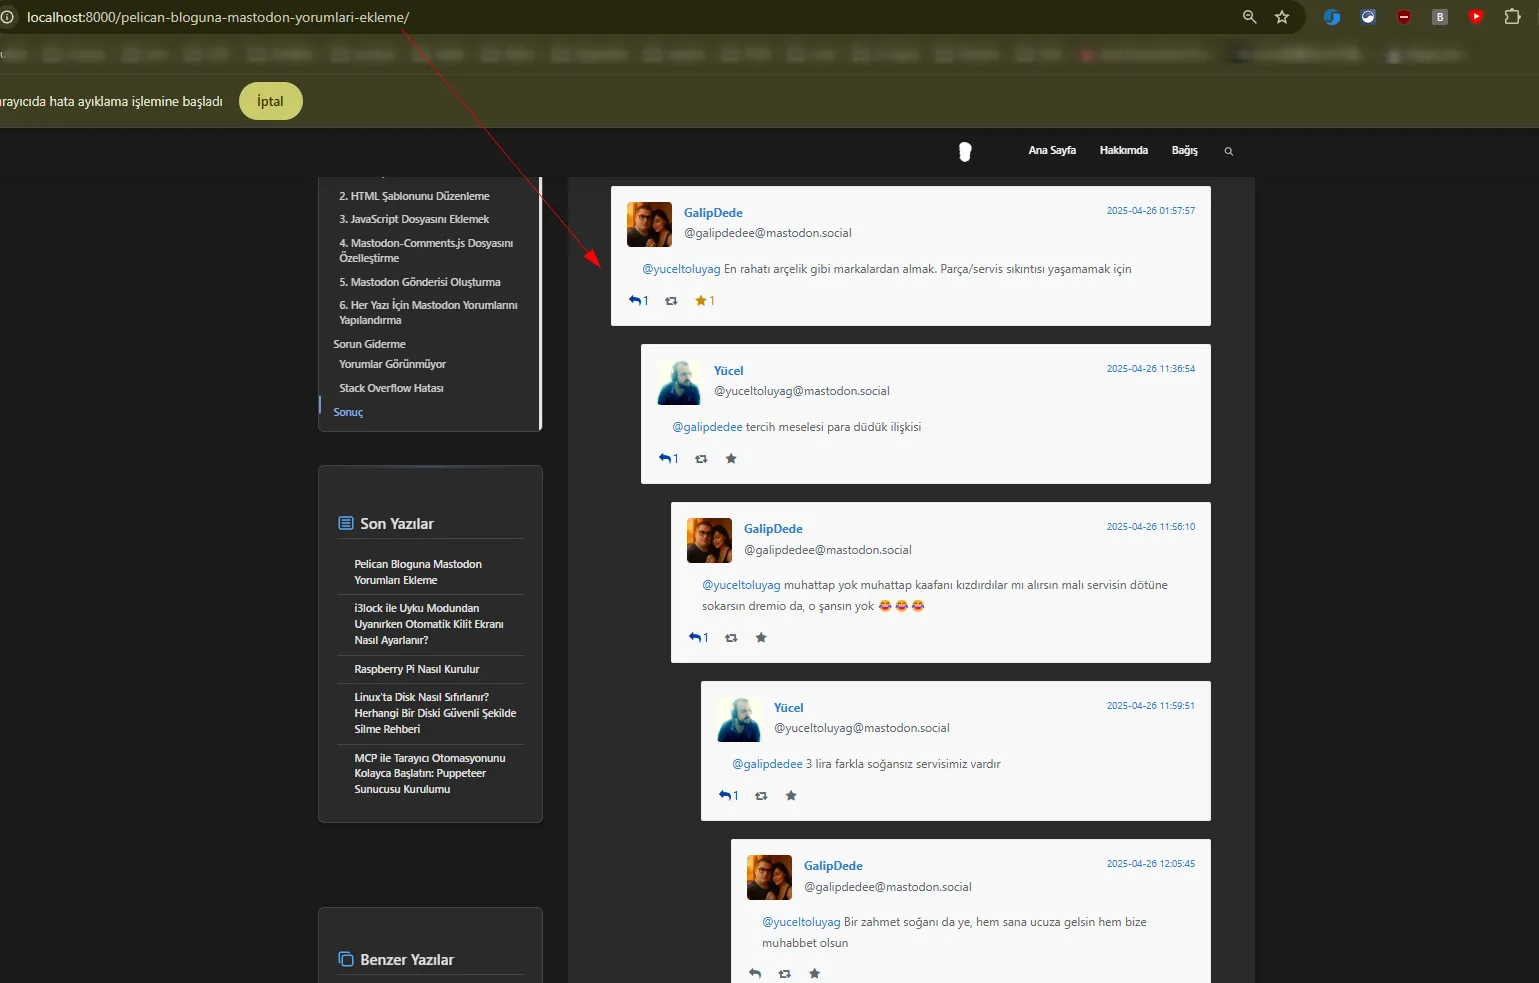
Mastodon is a decentralized social network, and every post has a unique URL. Using this URL, you can integrate the replies made to that post into your blog. This way, your readers can comment on your articles using their Mastodon accounts.
Advantages of this method: - Contains no third-party trackers or ads - Users can comment with their own Mastodon accounts - Uses a decentralized structure - Easy to install and maintain
Requirements#
- Pelican blog system
- Mastodon account
- A Mastodon post where you can share your blog posts
Installation Steps#
1. Downloading the Mastodon Comments Webcomponent#
The first step is to download the necessary JavaScript file for Mastodon comments. This file is a web component developed by Daniel Pecos.
curl -s https://raw.githubusercontent.com/dpecos/mastodon-comments/master/mastodon-comments.js -o themes/YOUR_THEME_NAME/static/js/mastodon-comments.js
2. Editing the HTML Template#
Now, let's edit the article.html template and add the section that will display the Mastodon comments. Add the following code after the Webmentions section:
<!-- Mastodon Comments -->
<div class="mastodon-comments-container">
    <h2 class="mastodon-comments-title">Mastodon Comments</h2>
    <p>To discuss this post via Mastodon, you can reply to the <a href="https://MASTODON_SERVER/@USERNAME/POST_ID" target="_blank">Mastodon post</a>.</p>
    <script src="https://cdn.jsdelivr.net/npm/dompurify@3.2.5/dist/purify.min.js"></script>
    <link rel="stylesheet" href="https://cdnjs.cloudflare.com/ajax/libs/font-awesome/4.7.0/css/font-awesome.min.css">
    <mastodon-comments
        host="MASTODON_SERVER"
        user="USERNAME"
        tootId="POST_ID"
        style="width: 100%; max-width: 800px; margin: 0 auto;"></mastodon-comments>
    <style>
        .mastodon-comments-title {
            margin-top: 2rem;
            margin-bottom: 1rem;
            font-size: 1.8rem;
            border-bottom: 2px solid #eee;
            padding-bottom: 0.5rem;
        }
        .mastodon-comments-container p {
            margin-bottom: 1.5rem;
            color: #666;
        }
        .mastodon-comments-container p a {
            color: #3182ce;
            text-decoration: none;
        }
        .mastodon-comments-container p a:hover {
            text-decoration: underline;
        }
        #mastodon-comments-list {
            margin-top: 1.5rem;
        }
        .mastodon-comment {
            box-shadow: 0 1px 3px rgba(0,0,0,0.1);
            margin-bottom: 1.5rem !important;
            transition: transform 0.2s;
        }
        .mastodon-comment:hover {
            transform: translateY(-2px);
            box-shadow: 0 4px 6px rgba(0,0,0,0.1);
        }
    </style>
</div>
3. Adding the JavaScript File#
Now, let's add the JavaScript file to the script section of the template:
{% block scripts %}
<!-- Other scripts... -->
<script src="{{ SITEURL }}/{{ THEME_STATIC_DIR }}/js/mastodon-comments.js" defer></script>
{% endblock %}
4. Customizing the Mastodon-Comments.js File#
In some cases, you might experience issues with the original mastodon-comments.js file. By making the following changes, you can ensure that comments are displayed correctly:
a) Solving the Comment Filtering Issue#
Change the render_toots function as follows:
render_toots(toots, in_reply_to, depth) {
    console.log(`MastodonComments: render_toots started - in_reply_to: ${in_reply_to}, depth: ${depth}`);

    // Let's add depth control to prevent too deep recursion
    if (depth > 10) {
        console.log(`MastodonComments: Maximum depth reached (${depth}), rendering stopped`);
        return;
    }

    // Show only root comments, process others recursively
    if (depth === 0) {
        // First level - show all comments without filtering
        var tootsToRender = toots;
        console.log(`MastodonComments: First level comments - total: ${tootsToRender.length}`);
    } else {
        // Sub-levels - show only those that are replies to a specific comment
        var tootsToRender = toots.filter((toot) => toot.in_reply_to_id === in_reply_to);
        console.log(`MastodonComments: Sub-level comments - in_reply_to: ${in_reply_to}, found: ${tootsToRender.length}`);
    }

    // Sort comments (date sorting)
    tootsToRender = tootsToRender.sort((a, b) => a.created_at.localeCompare(b.created_at));

    // Render each comment
    tootsToRender.forEach((toot) => {
        // Has this comment been rendered before?
        if (toot._rendered) {
            console.log(`MastodonComments: Toot already rendered, skipping - id: ${toot.id}`);
            return;
        }

        // Mark this comment as rendered
        toot._rendered = true;

        this.render_toot(toots, toot, depth);
    });
}
b) Adding Emoji Support#
Add emoji support to the render_toot function:
render_toot(toots, toot, depth) {
    // Process emojis in the name
    toot.account.display_name = this.escapeHtml(toot.account.display_name);
    toot.account.emojis.forEach((emoji) => {
        toot.account.display_name = toot.account.display_name.replace(
            `:${emoji.shortcode}:`,
            `<img src="${this.escapeHtml(emoji.static_url)}" alt="Emoji ${
                emoji.shortcode
            }" height="20" width="20" />`
        );
    });

    // Process emojis in the content
    let processedContent = toot.content;
    if (toot.emojis && toot.emojis.length > 0) {
        toot.emojis.forEach((emoji) => {
            const emojiCode = `:${emoji.shortcode}:`;
            const emojiImg = `<img src="${this.escapeHtml(emoji.static_url)}" alt="Emoji ${
                emoji.shortcode
            }" height="20" width="20" />`;

            // Replace emoji code with emoji image (find all matches)
            processedContent = processedContent.split(emojiCode).join(emojiImg);
        });
    }

    // Create Mastodon comment
    const mastodonComment = `<div class="mastodon-comment" style="margin-left: calc(var(--comment-indent) * ${depth})">
        <!-- Comment content -->
        <div class="author">
            <!-- Author info -->
        </div>
        <div class="content">${processedContent}</div>
        <!-- Other content -->
    </div>`;

    // ...continued...
}
5. Creating a Mastodon Post#
For comments to be displayed, you need to create a Mastodon post for each of your blog posts. You can create this post as follows:
- Log in to your Mastodon account
- Create a new post
- Share the title and URL of your blog post
- Publish the post
- Get the
tootIdparameter from the post URL (e.g.,https://mastodon.social/@user/123456789012345678-> tootId:123456789012345678)
6. Configuring Mastodon Comments for Each Post#
If you are going to use a different Mastodon post for each post, you can define the tootId in the post metadata:
Title: Post Title
Date: 2025-05-01
Category: Web Geliştirme
Tags: tag1, tag2
Mastodon_TootId: 123456789012345678
Then, you can use it in your template as follows:
<mastodon-comments
    host="mastodon.social"
    user="username"
    tootId="{{ article.mastodon_tootid|default('DEFAULT_TOOT_ID') }}"
    style="width: 100%; max-width: 800px; margin: 0 auto;"></mastodon-comments>
Troubleshooting#
Comments Not Appearing#
There could be several reasons why comments are not appearing:
-
DOMPurify Issue: Make sure the DOMPurify library is loaded correctly. Check the error messages in the browser console.
-
Mastodon API Restrictions: In some cases, the Mastodon API might not show replies with "private" or "unlisted" visibility.
-
CORS Issues: Check for CORS errors in your browser's developer tools.
-
JavaScript Errors: Check for JavaScript errors in the Console and add debug information when necessary.
Stack Overflow Error#
If an infinite loop occurs, there might be a circular call between the render_toots and render_toot functions. To prevent this, the _rendered flag is used to render each toot only once.
Conclusion#
Mastodon comments provide an excellent comment system for static blogs. With its decentralized structure, ease of use, and respect for privacy, it offers a great experience for both blog owners and readers.
By using this integration, you can offer your readers the opportunity to share their comments via Mastodon and connect your blog content to the Fediverse.
If you encounter any issues, you can check out the following resources:
- GitHub - dpecos/mastodon-comments
- Daniel Pecos Martinez's blog post
- You can access the modified version of the Javascript here mastodon-comments.js
- Changes made in this project here you can see that my files have not been deleted.
- In the changes made in this commit, you can better understand which file you should make changes to because I accidentally deleted articles and files. Deleted Files
Comments