Series: Git
Part 6/10There's a challenge we constantly face in software development: writing meaningful commit messages. Have you ever thought whether you could automate this routine? Good news: GitHub Copilot can now analyze your changes and suggest meaningful commit messages! 🚀
In this guide, we'll show you step by step how to use GitHub Copilot's commit message auto-completion feature most effectively. You'll become a hero in your colleagues' eyes and your git history will be more organized than ever!
Why Should I Write Commit Messages with GitHub Copilot?#
Have you ever walked through a project wondering "Why was this change made?" Or have you looked at your own commit messages and wondered "What does this mean?" This is exactly where GitHub Copilot comes into play.
Advantages of writing commit messages with GitHub Copilot:
- ⏱️ Time Savings: Instead of manually explaining changes, AI does it for you
- 🔄 Consistency: All team members create messages in similar format
- 📝 Detail: Comprehensive and understandable explanations of changes made
- 🧠 Less Mental Load: Escape from "How should I explain what I wrote?" stress
Moreover, thanks to this AI-powered feature, your commit messages will become much more professional than meaningless expressions like "changes made".
Installation: Integrating GitHub Copilot to VS Code#
If you want GitHub Copilot to complete your commit messages, it first needs to be properly installed to your system. Here are the steps to install GitHub Copilot to VS Code:
1. Installing the GitHub Copilot Extension#
- Open VS Code
- Press Ctrl + Shift + X on your keyboard to open the Extensions section
- Type "GitHub Copilot" in the search box
- Find the "GitHub Copilot" extension from the results and click the "Install" button
- After download completes, restart may be required
2. Connect to Your GitHub Account#
After installation is complete:
- VS Code will show you a notification - click on "Sign in to GitHub"
- Log in to your GitHub account in your browser
- Approve the required permissions
- When you return to VS Code, you'll see a message indicating Copilot is active
Note: There's a free version of GitHub Copilot! In the free version, you have 2,000 completions and 50 chat requests per month. You can switch to the paid plan for more usage. If you're a student, you can apply for free access through GitHub Student Developer Pack.
Creating Custom Coding and Commit Instructions (Current Method)#
You can define custom instructions for GitHub Copilot to generate commit messages that match your style. This step is optional but significantly increases Copilot's efficiency.
IMPORTANT UPDATE: GitHub Copilot now uses a new system for managing custom instructions. You now need to collect your instructions in a single
.github/copilot-instructions.mdfile.
1. Create Project Configuration Files#
First, create the necessary directory and files in your project folder:
mkdir -p .github
touch .github/copilot-instructions.md
2. Define Your Coding Style and Commit Message Format#
Open the .github/copilot-instructions.md file and specify your coding preferences along with commit message format:
## Project Instructions

## Code Style Guide

### General Guidelines

- Keep the code simple and readable.
- Use Prettier for code formatting.

### CSS

- Use class names that are descriptive and follow a consistent naming convention.
- Avoid using IDs for styling.
- Organize CSS properties in a logical order.

### Tailwind CSS V4

- Use utility-first classes to build components.
- Avoid using custom CSS when possible.
- Group related classes together for better readability.
- Use DaisyUI classes for components.

### JavaScript

- Use `const` and `let` instead of `var`.
- Prefer arrow functions for anonymous functions.
- Use template literals for string concatenation.
- Always use semicolons.
- Follow the Prettier configuration for formatting.

---

## Commit Style Guide

We follow the [Conventional Commits](https://www.conventionalcommits.org/en/v1.0.0/){: target="\_blank" rel="noopener noreferrer"} style for our commit messages. Here are some examples:

- `feat: add new user authentication module`
- `fix: resolve issue with data fetching.`
- `docs: update README with installation instructions`
- `style: format code with Prettier`
- `refactor: improve performance of data processing`
- `test: add unit tests for user service`
- `chore: update dependencies`

### Commit Message Rules

- Use imperative mood (e.g., "add feature" not "added feature")
- Keep the subject line under 50 characters
- Capitalize the subject line
- Do not end the subject line with a period
- Separate subject from body with a blank line
- Use the body to explain what and why vs. how
3. Update VS Code Settings#
Open the .vscode/settings.json file and add the following code block:
{
  "github.copilot.chat.codeGeneration.useInstructionFiles": true
}
NOTE: The old settings
github.copilot.chat.codeGeneration.instructionsandgithub.copilot.chat.commitMessageGeneration.instructionsare no longer used. You need to remove these settings.
This configuration will teach GitHub Copilot your coding style and commit message format. 🎯 For detailed review, see GitHub Copilot's official documentation.
Enable Verbose Mode#
For GitHub Copilot to better analyze your commit messages, you need to enable Git's verbose mode. This mode shows Copilot your changes in more detail, allowing it to make more accurate suggestions.
Open the terminal and run the following command:
git config --global commit.verbose true
Thanks to this setting, all changes will appear in your commit editor when making commits, and GitHub Copilot will use this information to suggest more accurate commit messages.
Using Copilot for Commit Messages#
Now everything is ready! Follow these steps to use GitHub Copilot to generate your commit messages:
1. Stage Your Changes#
First, stage all changes you want to commit:
git add .  # Adds all changes
# OR
git add file_name  # Adds a specific file
2. Open the Commit Editor#
Run the following command to open the commit editor:
git commit
3. Use Copilot's Suggestions#
When the commit editor opens in VS Code:
- You'll see a "Generate Commit Message" button at the top of the editor
- Click this button
- GitHub Copilot will analyze your changes and suggest an appropriate commit message
- Review the suggested message and edit if necessary
- Press Ctrl + S to save and close the editor
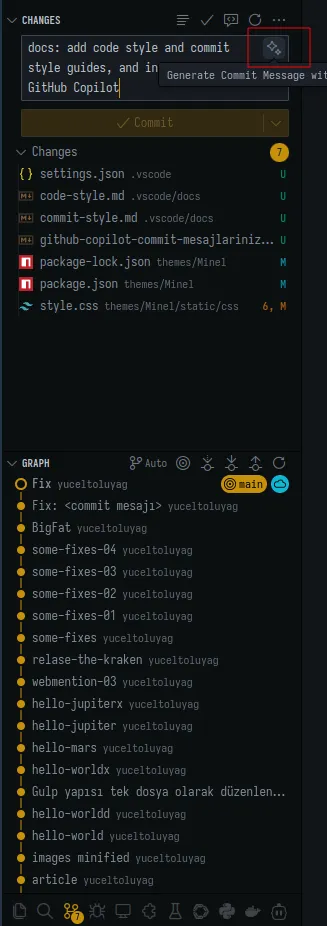
Tip: Don't hesitate to edit if Copilot's suggestion isn't as you wish. Copilot only provides you with a starting point.
Advanced Tips and Best Practices#
Some advanced tips to make your commit messages even more effective with GitHub Copilot:
1. Create Logical Commit Groups#
Don't make too many changes in a single commit. Each commit should contain changes that are logically related to each other. This helps Copilot analyze changes better.
# Good approach
git add src/authentication/
git commit  # "feat: added user authentication system"
git add src/ui/components/
git commit  # "style: improved login form appearance"
2. Correct Copilot's Misinterpretations#
Copilot is not always perfect. Always review and correct the commit messages it suggests. Especially:
- May contain spelling errors
- May misunderstand the scope of changes
- Rarely may suggest completely irrelevant messages
3. Use Custom Prompt Tips#
You can guide Copilot by adding special notes to the commit editor:
# Copilot: This change was made for performance improvement
# Copilot: related to issue #123
These notes won't be included in the commit, they only help Copilot.
Common Issues and Solutions#
❓ Copilot Doesn't Suggest Commit Message#
- Check that the Copilot extension is up to date
- Restart VS Code
- Make sure your GitHub account is active and connected
- Verify that
--verbosemode is enabled
❓ I'm Getting "Use instructions files instead" Error#
This error occurs when you use the old instruction method. For solution:
- Open your
.vscode/settings.jsonfile - Remove old instruction settings:
  // Delete these lines
  "github.copilot.chat.codeGeneration.instructions": [
      {
          "file": "docs/code-style.md"
      }
  ],
  "github.copilot.chat.commitMessageGeneration.instructions": [
      {
          "file": "docs/commit-style.md"
      }
  ]
- Add the new setting:
{
  "github.copilot.chat.codeGeneration.useInstructionFiles": true
}
- Create the
.github/copilot-instructions.mdfile and move your instructions there
❓ Suggestions Are Too General or Irrelevant#
- Make smaller and more focused commits
- Edit your
.github/copilot-instructions.mdfile and make it more specific - Add manual tips in the commit editor
❓ "Generate Commit Message" Button Doesn't Appear in VS Code#
- Make sure you've also installed the GitHub Copilot Chat extension
- Update VS Code
- Disable and re-enable the extension
Conclusion and Looking Forward#
Creating commit messages with GitHub Copilot significantly speeds up your software development process and makes your project's git history more understandable. Thanks to the techniques you learned in this guide:
- ⏱️ You'll save significant amount of time every day
- 📈 Maintenance and tracking of your project will become easier
- 🤝 You'll provide consistent commit messages among team members
GitHub Copilot is a perfect example of how AI technology can improve software development processes. When you adopt this technology and integrate it into your workflow, you'll see how your productivity increases!
Share Your Experiences! 💬
What are your experiences with creating commit messages with GitHub Copilot? What custom instructions are you using? Share in the comments and help other developers!
In our next article we'll explore how GitHub Copilot can be used in code reviews. Stay tuned! 🚀
Comments