Series: Git
Part 2/10Hello#
Those who follow my stories on Instagram were asking how I customize my Windows Terminal. 🙄 I said wait for my blog post about this topic and that awaited moment has come 😂🥱
Ingredients 🥗#
- Nerd Fonts
- Windows Terminal Preview
- Windows PowerShell
- Scoop
- Git
- Oh My Posh
- Terminal Icons
- PSReadLine
- Z
- PSFzf
Font#
If you want icons to be displayed correctly in your terminal:
- You must use Nerd Fonts.
- The full Nerd Fonts collection is more than 2 GB. You don't need to download all of them; you can select and install the font you like. Enjoy! =)
Microsoft Store#
Install these two applications. After installation, open our Windows Terminal application and go to settings.
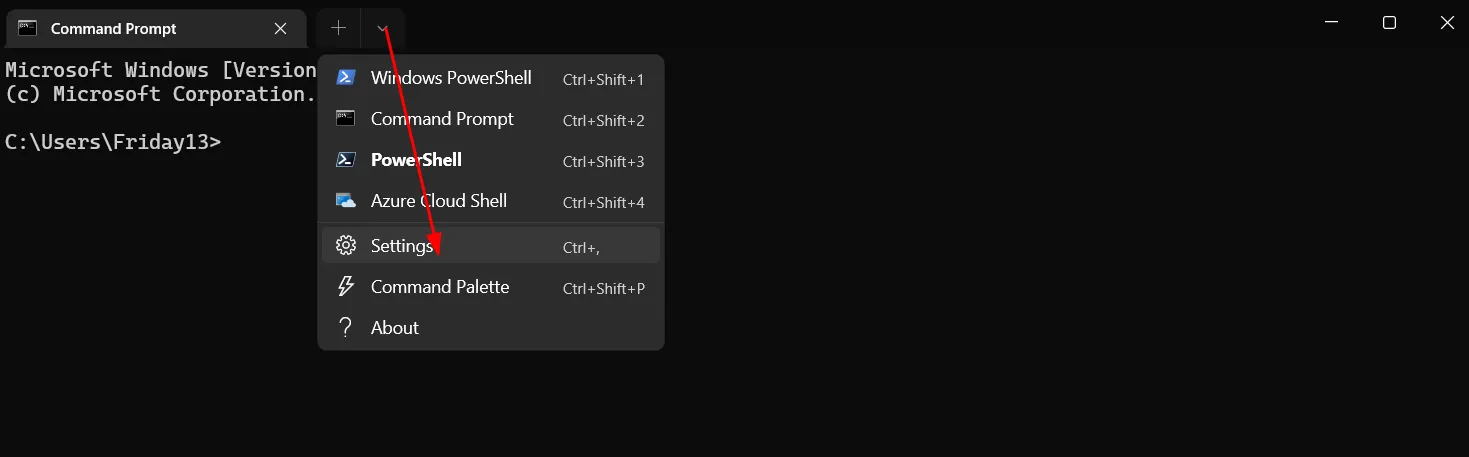
After going to settings, your settings in the appearance tab should be as follows.
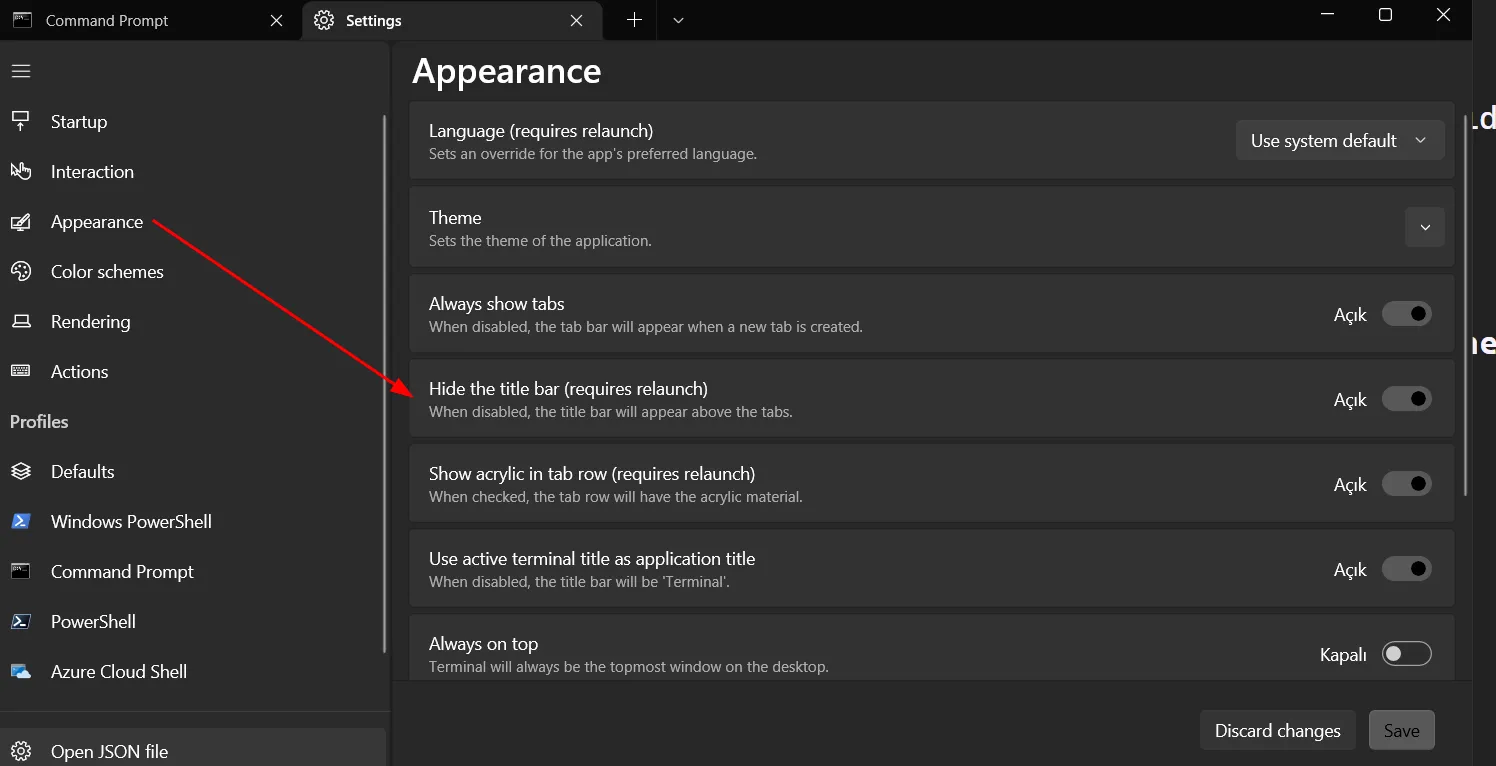
After saving the settings, click on the Startup section. Set the Powershell we installed as default.
 Save the settings and go to the Defaults tab, then make your Font settings from the Appearance section there.
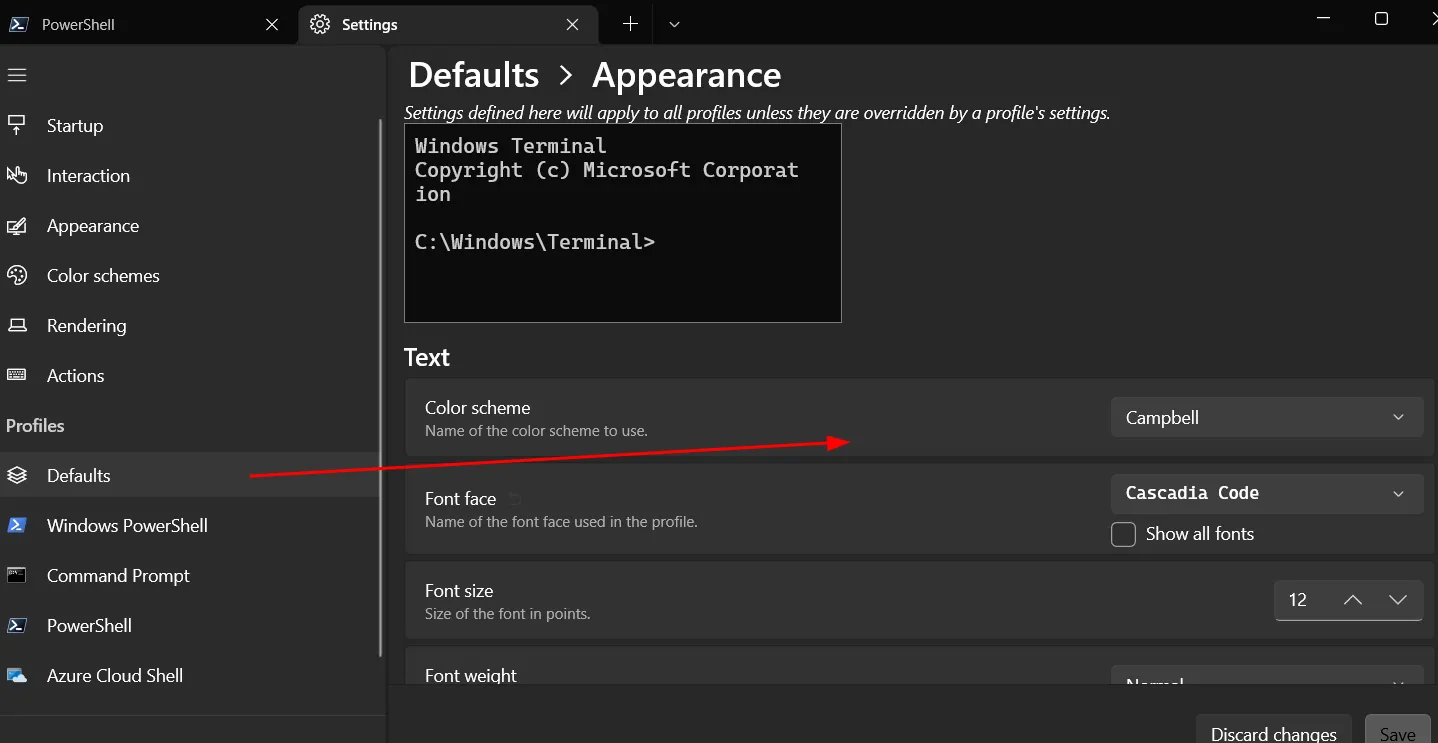 After making your Font settings, activate "Enable Acrylic" which is on the same screen and save the settings.

After doing all these, close your Terminal and reopen it.
Scoop#
To install Scoop, type the following commands in order:
Set-ExecutionPolicy RemoteSigned -Scope CurrentUser
irm get.scoop.sh | iex
After installing Scoop, run the following commands to avoid package not found errors:
scoop bucket add main
scoop bucket add extras
It will update the database. This process may take some time.
After installation is complete:
scoop install curl sudo jq
output:
Installing '7zip'  (21.07)  [64bit]

7z2107-x64.msi (1.8 MB)  [=========================================] 100%

Checking hash of 7z2107-x64.msi ... ok.

Extracting 7z2107-x64.msi ... done.

Linking ~\scoop\apps\7zip\current =>  ~\scoop\apps\7zip\21.07

Creating shim for  '7z'.

Creating shortcut for 7-Zip (7zFM.exe)

Persisting Codecs

Persisting Formats

Running post-install script...

'7zip'  (21.07) was installed successfully!

Notes

-----

Add 7-Zip as a context menu option by running:

"C:\Users\Friday13\scoop\apps\7zip\current\install-context.reg"

Installing 'curl'  (7.83.1_1)  [64bit]

curl-7.83.1_1-win64-mingw.tar.xz (2.6 MB)  [=======================] 100%

Checking hash of curl-7.83.1_1-win64-mingw.tar.xz ... ok.

Extracting curl-7.83.1_1-win64-mingw.tar.xz ... done.

Linking ~\scoop\apps\curl\current =>  ~\scoop\apps\curl\7.83.1_1

Creating shim for  'curl'.

'curl'  (7.83.1_1) was installed successfully!

Installing 'jq'  (1.6)  [64bit]

jq-win64.exe (3.4 MB)  [===========================================] 100%

Checking hash of jq-win64.exe ... ok.

Linking ~\scoop\apps\jq\current =>  ~\scoop\apps\jq\1.6

Creating shim for  'jq'.

'jq'  (1.6) was installed successfully!

Installing 'sudo'  (0.2020.01.26)  [64bit]

sudo.ps1 (2.2 KB)  [===============================================] 100%

Checking hash of sudo.ps1 ... ok.

Linking ~\scoop\apps\sudo\current =>  ~\scoop\apps\sudo\0.2020.01.26

Creating shim for  'sudo'.

'sudo'  (0.2020.01.26) was installed successfully!
Then install neovim and gcc packages:
scoop install neovim gcc
output:
Installing 'gcc'  (11.2.0)  [64bit]

components-18.0.7z (96.4 MB)  [====================================] 100%

Checking hash of components-18.0.7z ... ok.

Extracting components-18.0.7z ... done.

Running pre-install script...

Linking ~\scoop\apps\gcc\current =>  ~\scoop\apps\gcc\11.2.0

'gcc'  (11.2.0) was installed successfully!

Installing 'neovim'  (0.7.0)  [64bit]

nvim-win64.zip (36.4 MB)  [========================================] 100%

Checking hash of nvim-win64.zip ... ok.

Extracting nvim-win64.zip ... done.

Linking ~\scoop\apps\neovim\current =>  ~\scoop\apps\neovim\0.7.0

Creating shim for  'nvim'.

Creating shim for  'nvim-qt'.

Creating shortcut for Neovim (nvim-qt.exe)

'neovim'  (0.7.0) was installed successfully!

'neovim' suggests installing 'extras/vcredist2022'.
Git Installation#
winget install -e --id Git.Git
output:
winget install -e --id Git.Git

The `msstore`  source requires that you view the following agreements before using.

Terms of Transaction: https://aka.ms/microsoft-store-terms-of-transaction

The source requires the current machine's 2-letter geographic region to be sent to the backend service to function properly (ex. "US").


Do you agree to all the source agreements terms?

[Y] Yes [N] No: Y

Found Git [Git.Git] Version 2.36.1

This application is licensed to you by its owner.

Microsoft is not responsible for, nor does it grant any licenses to, third-party packages.

Downloading https://github.com/git-for-windows/git/releases/download/v2.36.1.windows.1/Git-2.36.1-64-bit.exe

██████████████████████████████ 47.3 MB / 47.3 MB

Successfully verified installer hash

Starting package install...

Successfully installed
After installation is complete, set up your Git settings. If you don't know, you can check the Creating Git ssh-key (windows&linux) article.
Powershell Config#
Make sure you are in your user directory: C:\Users\YourUsername. Do the operations in this directory. When you open Terminal, it opens this directory by default, I'm saying this in case you changed it. Then don't say "oh my god it doesn't work for us" :)
mkdir .config/powershell
Then we create a file named user_profile under this directory we created.
nvim .\.config\powershell\user_profile.ps1
Write the following lines inside:
# set PowerShell to UTF-8
[console]::InputEncoding = [console]::OutputEncoding = New-Object System.Text.UTF8Encoding

Import-Module posh-git
$omp_config = ".\material.omp.json"
oh-my-posh init pwsh --config "$env:POSH_THEMES_PATH\$omp_config"  | Invoke-Expression

Import-Module -Name Terminal-Icons
Set-PSReadLineOption -EditMode Vi
...
After making these settings:
nvim $PROFILE.CurrentUserCurrentHost
Write the following inside:
. $env:USERPROFILE\.config\powershell\user_profile.ps1
Close and open your Terminal. Let's test:
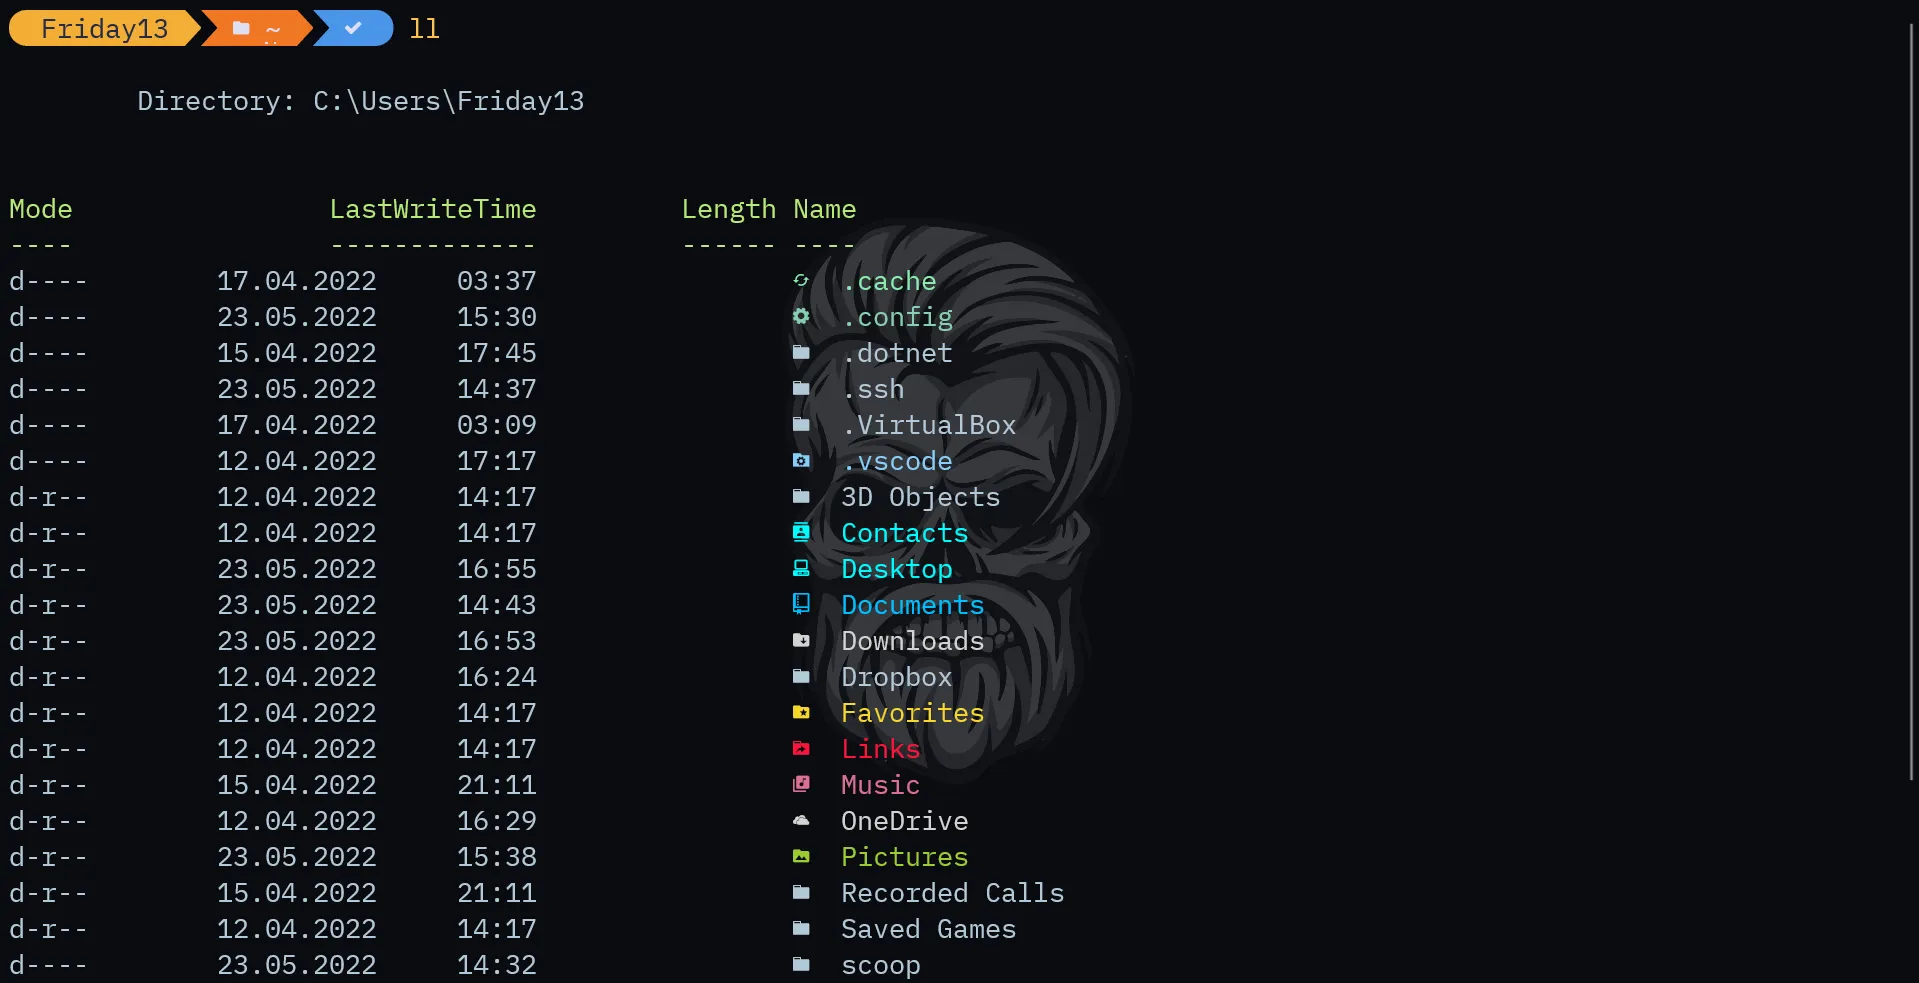
ll
Write and it will give you the directory output in a colorful way.
Packages#
Let's install our Oh My Posh package. Paste the two commands in order to the terminal and press enter 😏
Install-Module posh-git -Scope CurrentUser -Force
winget install oh-my-posh
Close and open Terminal.
NVM (NodeJS Version Manager)
scoop install nvm # after installation, close and open terminal
nvm install lts
nvm use lts # If it gives an error
If you get the following warning when you write nvm use lts:
exit status 1: You do not have sufficient privilege to perform this operation.
Close the terminal and run it as administrator. Write nvm use lts again and start the terminal normally.
Terminal Icons
Install-Module -Name Terminal-Icons -Repository PSGallery -Force
Close and open Terminal, to test:
ll
Write the ll command and you should see icons next to the file names.
Z
Install-Module -Name z -Force
PSReadLine
Install-Module -Name PSReadLine -AllowPrerelease -Scope CurrentUser -Force -SkipPublisherCheck
FZF
scoop install fzf
output:
Installing 'fzf'  (0.30.0)  [64bit]
...
PSFzf
Install-Module -Name PSFzf -Scope CurrentUser -Force
Result#
Don't Teach Me How to Fish, Give Me the Fish#
If you're reading this article, you probably know what Git is 👊 Tools that work seamlessly on Linux sometimes have problems on Windows. For example, if you're not having problems using GPG, continue using it 🧠 But if you are having problems, I recommend using "gpg4win".
scoop install gpg4win
You can access my Windows Terminal DotFiles settings from here and customize them according to yourself.
Comments