Series: Git
Part 7/10"Making a Git commit" is like bread and water in the programmer's world. If you're writing code, you have to know how to save your changes to version control system. In this guide, I'll explain the process of committing to a project on GitHub from scratch, step by step with plenty of examples. Important update: We don't send directly to the main repository, instead we work on our own branch and always send with Pull Request (PR). I'll also explain how to set up with virtualenv + duty to view and test the project locally.
1️⃣ What You Need to Read Before Starting This Article#
If you haven't added an SSH key with Git before, or haven't looked at GPG signed commit/tag topics, definitely read these two articles first:
For this guide to proceed smoothly, Git must be installed, your SSH key should be added to GitHub, your GPG key must be defined for commit signatures, and Python must be installed (we'll use virtualenv and duty).
2️⃣ Prerequisites#
Check Git Installation#
Open your terminal and run this command:
git --version
Example output:
git version 2.50.1
If Git isn't installed, you can install it from git-scm.com/downloads.
Log in to GitHub Account#
If you don't have a GitHub account, quickly create one at github.com. If you have one, log in from browser.
Test SSH Connection#
ssh -T git@github.com
If successful, you'll see a message like this:
Hi yuceltoluyag! You've successfully authenticated, but GitHub does not provide shell access.
Check GPG Key#
git config --global user.signingkey
If the key doesn't appear, set it up by following the GPG tutorial.
3️⃣ Clone the Repository#
Example repo: yuceltoluyag.github.io
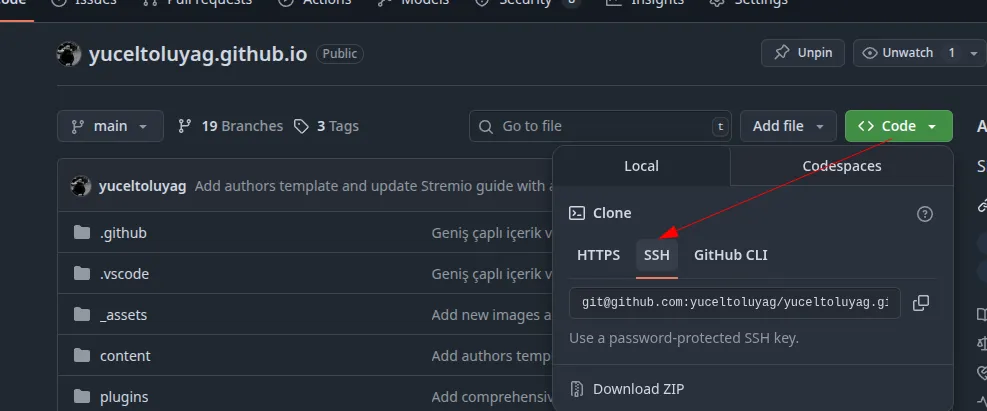
git clone git@github.com:yuceltoluyag/yuceltoluyag.github.io.git
cd yuceltoluyag.github.io
If you want to clone with HTTPS: git clone https://github.com/yuceltoluyag/yuceltoluyag.github.io.git. However, HTTPS requests username/password during push; SSH is usually more convenient.
4️⃣ Work on Your Own Branch: Why and How?#
We don't commit/push directly to the main branch (usually main). Instead we create our own branch and work there. This way the main repository structure isn't broken, all contributions come via Pull Request (PR).
Create new branch:
git checkout -b my-branch
Example:
git checkout -b friend-landing-update
Choose short, descriptive and hyphenated branch names: bugfix-typo-footer, feature-new-article-template, etc.
5️⃣ First Time Local Setup (virtualenv + duty)#
It's very important to run the project locally so you can see and test your changes. The following steps are for initial setup:
# 1) Create virtual environment
python -m venv venv

# 2) Activate virtual environment
source venv/bin/activate     # Linux/Mac
# Windows PowerShell: .\venv\Scripts\Activate.ps1

# 3) Install dependencies
pip install -r requirements.txt

# 4) Update project tasks/dependencies
duty update

# 5) Open in editor (optional but recommended)
code .

# 6) Start local server with live reload
duty livereload
You'll see the local URL in terminal output (usually http://127.0.0.1:8000 or http://localhost:8000). Visit this address in your browser to see your changes instantly. To stop the server, press ctrl c in the terminal.
If you run duty commands without activating the virtual environment (venv), the application won't start. Correct command: source venv/bin/activate (Linux/Mac). Wrong: source venv/bin/active (should end with 'activate').
6️⃣ Making Changes (Example)#
For example, let's add a small line to the README.md file:
This line is an example of a commit made from a branch. 🚀
To open in VS Code:
code .
Don't forget to edit and save the file. If the local server is running (livereload), the page will automatically refresh.
7️⃣ Check Changes#
What has changed?
git status
To see line-by-line differences:
git diff
Green shows new additions, red shows deletions.
8️⃣ Prepare and Sign Commit (GPG -S)#
Stage your changes:
git add .
# or for single file: git add README.md
Make signed commit:
git commit -S -m "README.md: added example line"
A good commit message is short and clear. Bad: update. Good: docs: added contribution flow to README.md.
9️⃣ Push Your Branch to Remote#
Now you can send your branch to GitHub:
git push -u origin my-branch
Example:
git push -u origin friend-landing-update
The -u parameter makes branch tracking easier for subsequent push/pull commands.
🔟 Open Pull Request (PR): Always PR!#
Go to the repo page in browser: https://github.com/yuceltoluyag/yuceltoluyag.github.io
GitHub usually shows a "Compare & pull request" button. Click it and create your PR. In the description area:
- Explain what you did
- Explain why you did it
- Explain how to test it
briefly. For this repository, we always open PR for 2nd and subsequent works; this way there's no confusion with the repo owner, code review flow is maintained.
In this project, don't push directly to the main branch. All contributions should come via branch → PR flow.
1️⃣1️⃣ Check on GitHub#
After opening the PR, you can see your commits and changes in the GitHub interface. If GPG signature is correct, you'll see a Verified tag next to the commit.
The GPG signature verifies that the commit truly belongs to you and provides security in team work.
1️⃣2️⃣ Second and Subsequent Work Sessions (Repeating Flow)#
When you open the project again, always apply these steps:
cd yuceltoluyag.github.io

# 1) Activate virtual environment
source venv/bin/activate      # Windows: .\venv\Scripts\Activate.ps1

# 2) Update project tasks/dependencies
duty update

# 3) Open in editor (optional)
code .

# 4) Start local server (live reload)
duty livereload
Why again and again? Because if the virtual environment isn't activated before starting, the application won't start. Also
duty updatekeeps tasks/dependencies up to date.
Recommended flow for a new work/feature:
# Update main branch:
git checkout main
git pull origin main

# Create new branch:
git checkout -b task-short-name

# Work, commit, push:
git add .
git commit -S -m "feat: added X feature"
git push -u origin task-short-name

# Always open PR:
# GitHub -> Compare & pull request
1️⃣3️⃣ Common Mistakes and Solutions#
| Error/Symptom | Reason | Solution |
|---|---|---|
command not found: duty |
Virtual environment not active or dependencies not installed | source venv/bin/activate → pip install -r requirements.txt → duty update |
| Application doesn't start | Commands run without activating venv | First source venv/bin/activate in every session |
Wrong command: source venv/bin/active |
File name error (activate should be used) |
Correct command: source venv/bin/activate |
Permission denied (publickey) |
SSH key missing/not added to agent | Add SSH key to GitHub, then add to agent with ssh-add |
gpg: signing failed |
GPG key undefined/password not entered | Set with git config --global user.signingkey; check if pinentry is installed |
| "conflict" warning in PR | New commits exist in main branch | Update before opening PR: git checkout main && git pull origin main |
| PR not opened, pushed directly to main | Process violation | Undo changes, follow flow: branch → push → PR |
To stop the local server, press ctrl c in the terminal. To restart, use duty livereload again.
1️⃣4️⃣ Example Complete Flow (Brief Summary)#
# First time:
git clone git@github.com:yuceltoluyag/yuceltoluyag.github.io.git
cd yuceltoluyag.github.io
git checkout -b friend-landing-update
python -m venv venv
source venv/bin/activate
pip install -r requirements.txt
duty update
code .
duty livereload   # See changes at local URL

# Work, edit, then:
git add .
git commit -S -m "docs: added contribution flow to README"
git push -u origin friend-landing-update
# On GitHub: Compare & pull request → Write description → Send PR
For subsequent sessions:
cd yuceltoluyag.github.io
source venv/bin/activate
duty update
code .
duty livereload
# For new work:
git checkout main && git pull origin main
git checkout -b new-task
# modify → commit → push → PR
🎯 Conclusion#
Now you not only learned the answer to "How to commit to a project on GitHub?", but you also know the correct flow which is work on branch + send via PR process, as well as the steps to set up locally. This approach:
- Keeps the main branch clean and stable,
- Enables review (code review) process,
- Prevents team confusion,
- Allows you to safely test and verify your changes.
In short, all the building blocks you need for professional participation are in this guide. Now it's your turn: Open your own branch, run locally, write descriptive commit messages and send via always PR. 🚀
Comments